Introduction
In today's digital age, having a strong online
presence is essential. A well-crafted portfolio website provides convenience,
can showcase your skills, attract potential clients or employers and help you
stay ahead of competition. While there are many options for hosting your
website or getting a domain name, GitHub offers a convenient and free solution.
What is a Domain Name?
A domain
name is a human-readable address for a website. This is how web users get to see your Website.
An example of a domain name is www.alientech.biz.
What is GitHub?
GitHub is a
popular platform for version control and collaboration among developers, with
features that enable smooth project development, real time collaboration and
also a possibility to preview project porotypes over the web. It also provides
a free hosting service for static websites, such as Portfolio Websites.
Why Host Your Portfolio on GitHub?
- Free
Hosting: You don't have to pay for hosting fees, and your website
can be available on the web as-long-as the platform is up and running.
- Easy
Setup and Deployment: The process of hosting projects on
the website is relatively straightforward and doesn't require complex
server configurations.
- Version
Control: GitHub's version control system allows you to
make modifications and also track changes to your project (website0 over
time, making it easier to collaborate and manage project updates.
- Integration
with Other Tools: GitHub seamlessly integrates and
communicates with other tools and services, such as CI/CD pipelines (an automated
process for building, testing, and deployment of software) and
analytics tools.
Step-by-Step Guide
1. Create a GitHub Account
- Sign
Up: You need a GitHub account in order to make use of the
platform features. Visit GitHub's website and create a free account.
- Create
a New Repository: Create a new repository (a dedicated
directory on the GitHub platform where you can store your code, your
files, and each file's revision history) to this is where you store your
website's files.
2. Create Your Portfolio Website
- HTML,
CSS, and JavaScript: Use these popular core web
technologies to build the structure, design or style, and provide
functionality to your website.
- Frameworks
and Libraries: In order to save time and energy while
achieving more output, consider using frameworks like Bootstrap to
accelerate development and enhance user experience.
- Design:
Create a catchy, clean, professional, and responsive design that showcases
your skills and meet your website project goals.
3.1. Push Your Portfolio to GitHub: Method 1
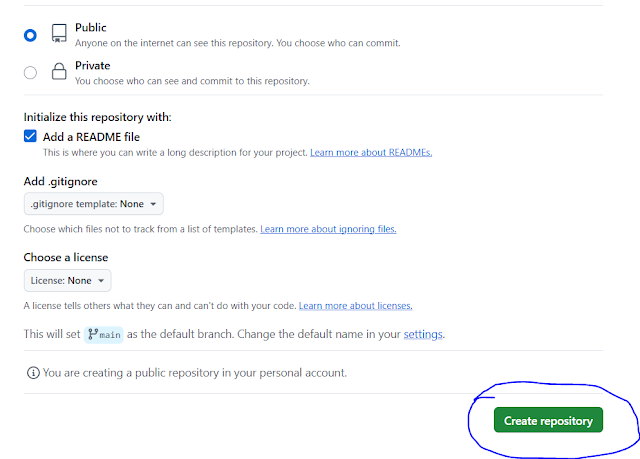
With this method, we manually create a repository and upload website files on GitHub. Create a catchy, clean, professional, and responsive design that showcases your skills and meet your website project goals.
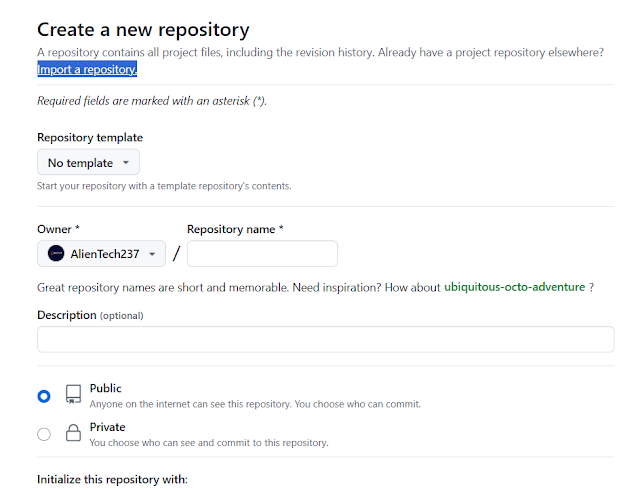
Step 1. On your profile home or dashboard, click the “New” button (top left of your screen).
Step 2. In the next window, under “Create a new repository” category, you have the option to “Import a repository” if you have earlier created a repository with another profile.
Step 3. You have the option to start your repository with a template repository's contents. This means you can use other repository’s content and continue with your project. If you want to continue from another project, then click on the dropdown arrow next to “No template”, you will be shown available repositories you can choose from.


Manually uploading files to GitHub Repository
Step 1. Tap the “Plus” icon and choose “Upload Files”

Step 3. After dropping files, you will be able to see the upload progress via the progress bar bellow, showing number of files uploaded and how many files left.


Step 5. Once the commit process is complete, you will be redirected to your repository dashboard and you can view your uploaded files. Skip to 4. Configure GitHub Pages to get your website online.
 3.2. Push Your Portfolio to GitHub: Method 2
- Git Setup: Install Git on
your local machine.
- Initialize a Git Repository: In your project directory, run the following command in your terminal:
Bash
git init
- Stage Changes: Add your
project files to the staging area:
Bash
git add .
- Commit
Changes: Commit your staged changes to your local
repository:
Bash
git commit -m "Initial commit"
- Push to
Remote Repository: Push your local repository to your
GitHub repository:
Bash
git remote add origin https://github.com/your_username/your_repo_name.git
git push -u origin main
your_username and your_repo_name with your actual GitHub username
and repository name.
4. Configure GitHub Pages
Here we use the GitHub pages feature, which lets you get a domain which you can use for your website project. Your domain name will be the name of your GitHub repository, beginning with the GitHub domain extension.
- Go to your repository settings.
- Under the “General”
category, you can view your current domain name under the “Repository name”
sub category. In the dialogue box containing your current domain name, you
can input a new domain name and click the “Rename” button.
- Scroll down to the “Social
preview” category. Here you can upload and image of at least 640×320px
(1280×640px for best display) that will display as your website preview image on social media and
the web in general. Click the “Edit” icon to locate and upload your preferred
image.
- In the categories to the
left side of the screen, click on "Pages".
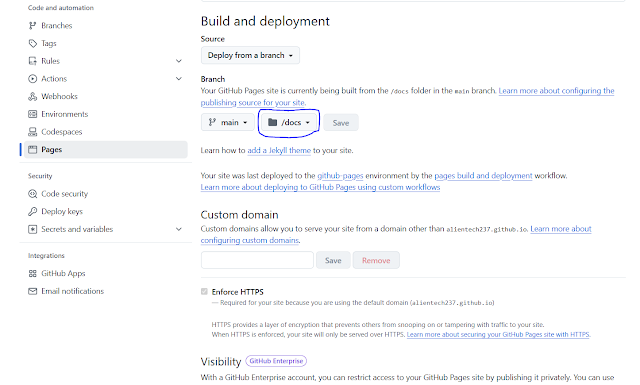
- Bellow the “Build and
deployment” Category, under the “Source”, make sure the “Deploy from
branch is selected”
- Under the “Branch” sub
category, check below and click the dropdown arrow next to “none” option
then select the "main" branch as the source.
- Tap on the dropdown next to "main" and then select "/docs" Click “Save”.
- Next, you will get a notification showing your website is live and
you can also see the website URL.
- Now you can click the link to view your website (give it some time
to propagate and your website will be live). Amazing right?😊😊😊
- There is More!!!😎😎😎 If you are not comfortable with the GitHub extension
in your website URL, you can get a custom domain and add to your website.
By adding a sub domain, your domain name becomes fully unique.
5. Accessing Your Portfolio
Your portfolio will be accessible at a GitHub
Pages URL, typically in the format: https://your-username.github.io/your-repo-name/.
Mine is: https://alientech237.github.io/portfolio_website/

Optional: Adding a Custom Domain
- Buy
a Domain: Purchase a domain name from a domain registrar
(e.g., Hostinger, Namecheap).
- Set
Up DNS: Configure your domain's DNS settings to point to
GitHub Pages.
- Add
a CNAME Record: Add a CNAME record in your DNS settings
to point your domain to your GitHub Pages repository.
Additional Tips
- Optimize
Your Website:
- Optimize
your images for faster website load speed.
- Security:
- Keep your GitHub credentials secure.
- Use strong passwords.
- Be cautious about sharing sensitive
information in your repository.
- SEO:
- Use relevant keywords in your content.
- Optimize your website's meta tags.
- Submit your website to search engines.
Check out our other useful blog posts from our website and get
even more value!!!
Note: To download this project and replace the files, then re-upload to your GitHub Repository, click 👉 Here.
Note: At ALIEN TECH - Digital Services, we provide top
notch Web Development services like custom websites, Content Management Systems
(WordPress), Web Application, Chatbots and More. Feel free to reach out to us for your Web Development needs.


%20Vs%20User%20Experience%20(UX),%20complete%20in-depth%20guide.jpg)

0 Comments
Leave A Comment